


In this article we are going the answer a question what to do in case of emergency water leaks. A leak occurs when water escapes from the pipes through a hole or loose connection between two pipes. To perform emergency leak repairs:
Table of Contents
1. Find the Leak
The first task is always to find the leak’s source. In some cases, the source is obvious: a hole or rupture in the pipe. Other cases may require some detective work, tracing the water’s path along the pipes in either direction, starting from the place where you spotted the water.
2. Turn Off the Water
Once you’ve found the leak, turn off the water using:
- A fixture shut-off valve
- A branch shut-off valve
- The main shut-off valve
You want to shut off as little of the flow of water into your house as possible, so try to stop the flow of water to the leak first by closing a fixture or branch shut-off before resorting to closing the main shut-off valve.
3. Drain and Dry the Pipe
Remove the water still in the pipe by opening the faucet or valve that the pipe leads to. Dry the pipe once the water is drained from it.
4. Fix the Leak
You can fix a leaking pipe in a variety of ways depending on the materials you have and the size of the leak. None of these fixes is a permanent solution, though. They’re merely emergency repairs designed to keep the water in your home running until you can bring in a professional to make permanent repairs.
Pencil Tip Leak Repair
If the leak is a small pinhole, you can plug it using a well-sharpened pencil and some electrical or duct tape.
- Insert the tip of the pencil into the hole.

- Snap off the pencil tip in the hole.
- Wrap a few layers of electrical or duct tape around the plugged hole.
Screw and Rubber Washer Leak Repair
If you have a small sheet-metal screw (also called a self- tapping screw) and a rubber washer on hand, you can use them to stop a small leak.
- Place the washer so that it surrounds the leaking hole.
- Drive the screw directly into the hole. Use a screw whose head is wide enough that it presses the washer against the pipe—but make sure the screw is shorter than the pipe width. Otherwise you’ll puncture the far side of the pipe.
Metal Repair Clamp
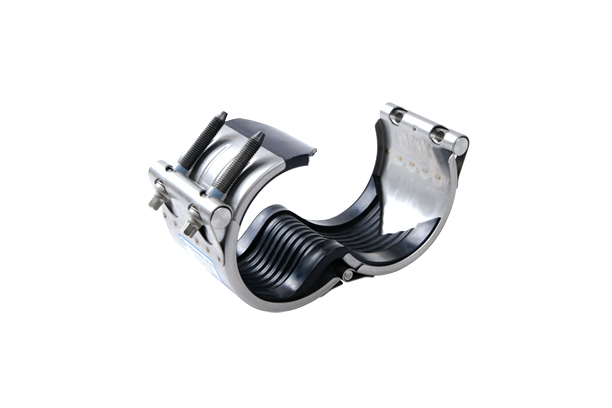
Pipe repair kits are available at all hardware stores for just a few dollars. The kits contain a square of flexible rubber and metal clamps that can be screwed together. Make sure the clamp you get is big enough to surround the pipe.
- Using both hands, arrange the rubber pad over the leak and put the clamps in place around the rubber.
- Holding the clamps in place with one hand, use the kit’s screws and nuts to screw the clamps together.
- Use an adjustable wrench and screwdriver to tighten the clamps in place around the pipe.
Epoxy Leak Repair
Epoxy is a putty that’s easy to use and can be shaped, making it a great tool for plugging leaks at joints between two pipes.
- Squeeze the epoxy from its tube and cut off a piece. Squeeze and work the two epoxy layers together.
- Apply epoxy to the leak.
- Give the epoxy time to set (follow the directions on the packaging) before turning on the water.
Leaks from a Joint Between Two Pipes
If the leak is coming from a joint where two pipes screw together, you may be able to fix it by tightening the nut that provides compression over the joint. If that doesn’t work, try disassembling the pipes (after turning off the water and draining the line) and applying Teflon tape to the threads before reassembling.