

In this guide we will be talking about how to fix toilet leaks. There are four main areas of a toilet that can leak:
Table of Contents
Closet Flange Area Leaks
If water is seeping out from under the toilet, there’s most likely a problem with the seal in the closet flange area. One potential way to fix leaks in this area is to use an adjustable wrench to tighten the mounting bolts, the bolts that attach your toilet to the floor. If that doesn’t work, hire a professional to remove the toilet and replace the seal.
Ballcock Connection Area Leaks
If water is leaking from the area where the water supply connects to the ballcock at the bottom of the tank, you should:
Tighten the Ballcock Locknut
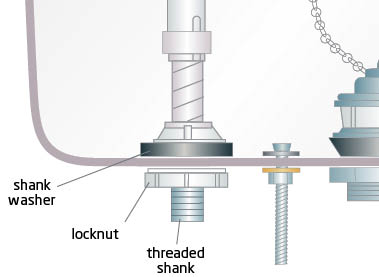
Use an adjustable wrench to tighten the locknut that anchors the ballcock in place. The locknut is located outside and underneath the tank, directly below the main column of the ballcock.
Replace the Shank Washer
If tightening the locknut doesn’t work, try replacing the shank washer at the base of the ballcock. To replace the shank washer, you must remove the entire ballcock:
- Turn off the water to the toilet from the supply line.
- Empty the tank of water completely.
- Remove the supply line running to the ballcock.
- Unscrew the locknut that holds the ballcock in place.
- Disconnect the refill tube and remove the ballcock.
- Replace the washer. Make sure the replacement is the right size and shape for your toilet.
- Reassemble the ballcock by following the previous six steps in reverse order.
Bowl-to-Tank Connection Leaks
If water is leaking from under the area between the tank and bowl, you have a leak in your bowl-to-tank connection. Specifically, the leak is coming through the seal between the tank and bowl, which is created by a fitting called a spud washer.
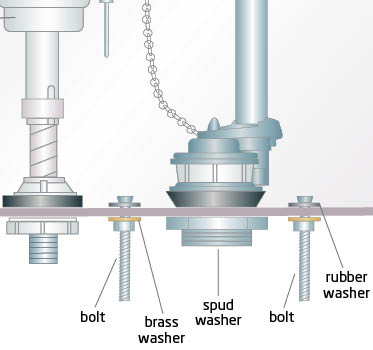
Over time, spud washers can deteriorate and fail. Replacing a spud washer isn’t complicated, but it requires you to lift and turn over the tank, which is heavy. It’s wise to enlist another person to help you with this part of the job.
- Turn off the water to the toilet from the supply line.
- Empty the tank of water completely.
- Remove the supply line from its connection to the tank.
- Two bolts emerge from the bottom of the tank and extend through holes at the back of the bowl. Unscrew the nuts that hold these bolts in place.
- Remove the tank from the bowl and turn it upside down on a flat, stable surface.
- Pry off the old spud washer and install the new one.

- You may also want to inspect and/or replace the rubber or brass washers that form a seal around the tank’s mounting bolts.
- Replace the tank by following the previous seven steps in reverse order.
Supply Line Connection Leaks
If the connection between the supply hose and the shut-off valve is leaking, you may be able to fix the problem simply by using an adjustable wrench to tighten the nut that connects the supply line to the shut-off valve.
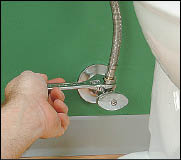
If that doesn’t work, you may have to apply Teflon tape to the valve’s threads:
- Use an adjustable wrench to loosen the nut that holds the supply line to the shut-off valve.
- Wrap a few layers of Teflon tape around the threads of the supply valve (for instructions on how to apply Teflon tape, see Plumbing Tools).
- Thread the nut back onto the supply valve and tighten.
